Thursday, February 14, 2013

Rustic Number Sampler

Here is a project I'd like to share with you...


I call it a "Rustic Number Sampler". 

If you are like me, I save all sizes and shapes of  wood.  "Scraps" from all my wood projects.  My husband was so glad to see that I was finally using up some of my collection.  He thinks my scrap collection is a bunch of junk wood, but I always can see it's potential.

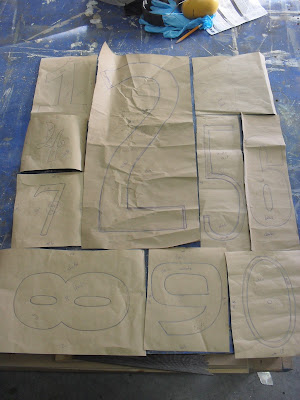
So, I started with an idea which I then put to paper, making myself a pattern.


I  searched my scrap pile to find the right size pieces of wood cutting them all to size using a table saw.  I then traced the numbers onto more scrap wood.  I used mdf, plywood and pine lumber all in varying thicknesses.  The number "2" was cut from scrap metal, the "3" and "4" were stenciled and I did an inside cut for the number "5" on 1/4" plywood.   I sanded everything to get them ready for stain and paint.  And, I filed and polished the metal number "2".


For the color palette, I used "Sandbar" color paint from Home Hardware, "Buttermilk" and "Lamp Black" by DecoArt and Minwax stain in two colors - dark walnut and puritan pine.


Once everything was dry, I did a bit more sanding to give some of the pieces a bit more of an aged appearance.   I then secured the numbers to the wood pieces using wood glue, stenciled the "3" and "4" onto the wood and secured the metal "2" with rivots.  Oh...and because the number "5" is an inside cut, I needed a backing so I used a piece of burlap!


Now for the hard part...how was I going to secure it all?  My husband suggested that I attach all the pieces to 1/4" plywood...good idea!  So, I made a frame out of weathered wood - again, a scrap collection sitting outside along the shop wall buried in snow.  (of course, I had to be patient and let the wood completely dry before assembling)  I attached the frame with an air nailer to the outside edges of my backing piece (the plywood) and then glued the numbered wood pieces inside the frame...kinda like putting together a jigsaw puzzle.  Once the glue dried, I attached picture hanging hardware to the back. 


I'm very happy with the way it turned out.  Best of all, I used up some of my scrap lumber, the project was free and now have new artwork to hang in the living room!


Thank you for stopping by...

Lesa

Friday, February 8, 2013

Rustic Plaque

I'm just getting a parcel together to send to my daughter, Taryn,  and I thought I'd make something for her.  Here it is...


It might not be "her thing", but I had fun making it!

I started with well-weathered lumber.  I cut 4 pieces 12" long.  I then cut one of the pieces in half .  These two pieces will sit at the bottom of the boards, one on the front and one on the back, as the base.


I glued all the boards together, then further secured them using an air nailer.  Once together I sanded the boards.

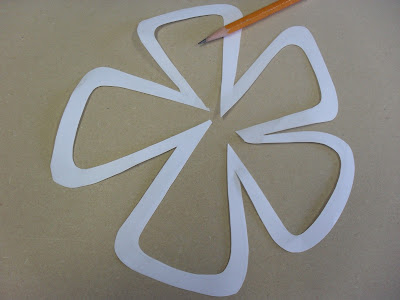
I made a flower pattern on paper, cut it out and traced it onto 1/4" thick mdf board.  I used my scrollsaw to cut the flower.


I then found a font on the computer which would be easy to cut out of wood.  Again, made a paper pattern, traced the letters onto 1/4" mdf and cut the letters using my scrollsaw.  Once I had all the pieces cut, I sanded them using 100 grit and then 220 grit sandpaper.


The flower center...my initial idea was to use a wood button...didn't have anything big enough.  So, I scrounged through all of my husband's scrap metal, bolts, screws, washers, etc.  This is what I found that I thought would work as a flower center.  Kinda rustic...


I placed everything on the plaque and drilled a hole (for the bolt to fit through) where the flower center would be...


I stained everything with dark walnut by Minwax.  Once dry, I painted the flower with "sandbar" and the letters with "blue mist" by Decoart.  Once dry, I lightly sanded the edges to allow the stain to be revealed, giving the pieces an aged look.


I secured everything with wood glue and inserted the flower center (the bolt) through the hole and secured it with a "nut" on the back.


 Hope she likes it!!


Taryn

Thank you for stopping by...

Lesa

Sunday, February 3, 2013

"M" is for...

Here's a quick project I'd like to share with you...


First I made an "M" pattern on an 8 1/2 x 11 piece of paper.


I then traced it onto a scrap piece of wood and cut it out using my scroll saw.


I used a scrap piece of tin that I found out behind our wood shed.    It was similar to the weight of metal/tin flashing - thin enough to easily cut with metal shears.


I then traced my pattern onto the tin and cut it out with metal shears.    Make sure to wear gloves when doing this because the metal has very sharp edges.


I then secured the metal "M" to the top of my wood "M" by drilling holes through both the tin and the wood and then hammering rivots in place.


I used a metal file along the sides to remove the sharp metal edges.  I rounded the metal with the file to make the wood and tin look like one piece.


I applied a grey paint color to the sides of the wood to blend with the metal  and then polished the metal surface with fine steel wool using a circular motion.


It was a bit too shiny so I wet the steel wood (slightly) and applied a "dab" of black paint to the steel wool.  I repeated the polishing process.   The black helped tone down the metal and bits of color settled around the rivots.


Now I have one accessory to add to my shelving...


Thank you for stopping by...

Lesa

Friday, February 1, 2013

Shelving

I have a small wall space between the french doors and the bay window in my kitchen.  I've hung pictures, candle sconces, old window frames and wreaths, but decided it was time to change it up.  So I decided the wall needed shelves.  Shelves will allow me to "change the look" and accessorize for different seasons.  Therefore, with the help of my husband we build these:


First we had to plane rough-cut lumber.  Amazing the mess it makes to plane just two boards!


After planing the wood he used the table saw to cut the pieces to the appropriate width.  He then measured and cut lengths and angles to make four brackets:


I wanted the brackets to look heavy and bulky so he added a top and bottom plate which gave them this look:


I cut two shelving pieces...one measuring 24 inches in length and one 32 inches in length.  I thought two different sizes might be more appealing.  Once we sanded all the pieces I painted the brackets with "sandbar" and stained the shelves with dark walnut by Minwax. 


As you can see, I still need add the "wood buttons" to hide the screw holes, but once I do I will paint them to blend with the brackets. 


Now I just need to accessorize the shelves!  I have a few ideas and a few projects for the shelves and will be sharing those with you in the next few days.  I hope you'll come back and check it out!

Thanks for stopping by!

Lesa

Monday, October 15, 2012

What Is It?

I'm sure you are asking yourself...What is it?


Well...it was part of a structure that kept the snow off the roof of our camper (which we don't have anymore).  Anyway, I found it out behind our garage and I thought I could put it to good use, so I took it into the shop and gave it a good sanding. 

This is before:

This is after:


I love the color of the wood even if it's just 2 x 4's!

After I finished sanding it, I removed all the dirt and dust and hung it here...


Over our bed.  Hmmmm....does it look like an "architectural" piece or three 2 x 4's bolted together? 


What can I say...our room needs a major makeover!


So, what do you think...does it stay or does it go?  Thanks for stopping by...have a great week!
Lesa

Sunday, May 27, 2012

Christmas in May

I've been wanting to paint this little table with a Christmas theme, but as the holidays approach I run out of time and never get it done, so I decided that this would be the perfect time to get the job done.

This is what I started out with...a simple round pine table...


This is what I transformed it into for the holidays...


Thank you for stopping by for a visit!  Have a great week.

Lesa

Sunday, May 6, 2012

Message Board

It's nothing that hasn't been done already, but I wanted to share it with you anyway.


I had an old window frame and decided to do the "chalkboard thing" with it.  I didn't make it for myself, but for a craft show that my sister, Jill, convinced me to do.  It's not until November, but it's four days long so that means I need alot of stuff!  This is one project that I will be selling.

So, back  to the chalkboard...here's what I started with...


I sanded the window frame and then applied a couple of coats of creamy white paint.  I sanded it again to expose some of the old paint and wood and then applied a dark walnut stain to the top to give it a warm, aged appearance.  I measured the two window inserts and cut my 1/4" mdf to fit.  I gave the boards three coats of chalk paint by Decoart, letting each coat completely dry.


I secured the chalkboard inserts into the back of the window frame.

I then decided to cut the letters to spell "Messages" out of the same 1/4" mdf.


I just used my computer to print the letters and then traced them onto the board.  I cut the letters out on my scrollsaw, gave them a light sanding to remove any rough edges and then stained them with a dark walnut stain.  I used hot glue to secure them to the window frame.  I then secured a self-levelling hanger to the back for hanging.


One project finished...I have alot of work ahead of me!!  Thank you for stopping by...hope you have a great week!

Lesa