Monday, October 15, 2012

What Is It?

I'm sure you are asking yourself...What is it?


Well...it was part of a structure that kept the snow off the roof of our camper (which we don't have anymore).  Anyway, I found it out behind our garage and I thought I could put it to good use, so I took it into the shop and gave it a good sanding. 

This is before:

This is after:


I love the color of the wood even if it's just 2 x 4's!

After I finished sanding it, I removed all the dirt and dust and hung it here...


Over our bed.  Hmmmm....does it look like an "architectural" piece or three 2 x 4's bolted together? 


What can I say...our room needs a major makeover!


So, what do you think...does it stay or does it go?  Thanks for stopping by...have a great week!
Lesa

Sunday, May 27, 2012

Christmas in May

I've been wanting to paint this little table with a Christmas theme, but as the holidays approach I run out of time and never get it done, so I decided that this would be the perfect time to get the job done.

This is what I started out with...a simple round pine table...


This is what I transformed it into for the holidays...


Thank you for stopping by for a visit!  Have a great week.

Lesa

Sunday, May 6, 2012

Message Board

It's nothing that hasn't been done already, but I wanted to share it with you anyway.


I had an old window frame and decided to do the "chalkboard thing" with it.  I didn't make it for myself, but for a craft show that my sister, Jill, convinced me to do.  It's not until November, but it's four days long so that means I need alot of stuff!  This is one project that I will be selling.

So, back  to the chalkboard...here's what I started with...


I sanded the window frame and then applied a couple of coats of creamy white paint.  I sanded it again to expose some of the old paint and wood and then applied a dark walnut stain to the top to give it a warm, aged appearance.  I measured the two window inserts and cut my 1/4" mdf to fit.  I gave the boards three coats of chalk paint by Decoart, letting each coat completely dry.


I secured the chalkboard inserts into the back of the window frame.

I then decided to cut the letters to spell "Messages" out of the same 1/4" mdf.


I just used my computer to print the letters and then traced them onto the board.  I cut the letters out on my scrollsaw, gave them a light sanding to remove any rough edges and then stained them with a dark walnut stain.  I used hot glue to secure them to the window frame.  I then secured a self-levelling hanger to the back for hanging.


One project finished...I have alot of work ahead of me!!  Thank you for stopping by...hope you have a great week!

Lesa

Wednesday, April 4, 2012

Table Centerpiece

I'm not really sure if this is worthy of posting, but I'll share it just because and, yes, it's another pallet project!!  I needed something for my kitchen table so I started with this...


I cut it down to make it look like a rustic box.  It needed handles on the sides but I wasn't about to head downtown to buy some, so I cut two blocks of wood from the leftover pallet wood, added a large screw to each block of wood and hung these hook thingys (they do have a name) on the screw to make them look like rustic handles - not functional and just for "show".


I had flowers that were given to me so I put them in the box...


I also tried using a bunch of artificial daisies...(real would be much better!)


Whatever I decide to use, I think this will be a suitable and functional kitchen table centerpiece...for now.

Thank you for stopping by and taking a look...have a great day!

Lesa


Saturday, March 24, 2012

The Making of a Collage

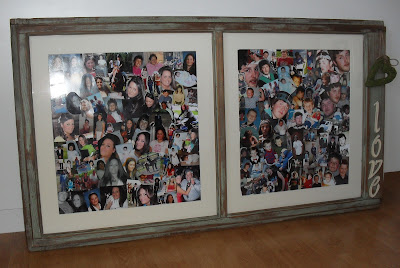
I finally figured out what to do with one of the two large window frames I bought last year for $10.00.  I decided to make a collage of my kids and use the window as the frame.  I know, this is nothing new, but I wanted to share my "creation" with you.


I started out with this...


One side had glass and the other did not, so I took a hammer and smashed the one remaining pane out of the frame.  Once the glass and all the sharp edges were removed, I sanded the entire frame to clean it up.  I had plans to paint it, however, the green paint on the frame actually matched (almost) perfectly with the green I had painted my entryway, so I decided to leave it as is and apply a dark walnut stain to the surface to enhance the wood grain showing through the bottom.


Next, I cut two pieces of glass to fit inside each window panel.

Now the hard part...finding enough pictures of my kids to make a large collage and, I have to admit, this was the tough part.  I've never been one to take alot of pictures and I discovered that I didn't take very many as they were growing up.  (regrets!)  Anyway, I gathered what I could and started attaching them to acid-free foamcore.  I then matted each collage with a creamy white matboard.  I secured the collage behind the glass and attached picture hanging hardware to the back.

I then cut the letters "love" from 1/4" mdf board using my scrollsaw and a small heart from scrap plywood.  I covered the heart with sheet moss and stained, painted and sanded the letters.  I attached the letters with hot glue and used jute twine to attach the moss heart to the frame.  The window frame already had a hole in it so I thought I'd get some use out of it.


I'm quite happy with the way it turned out.  It measures 5 ft. x 30" so it covers a large area in my hallway.  Now I just need to figure out what to put on either side of it.


Thank you for stopping by...I hope you have a great weekend!

Lesa

Sunday, March 11, 2012

Sheet Moss Heart

Here is quick and easy project to create that you can use pretty much anywhere in your home...its a sheet moss heart.


First, make yourself a heart template out of paper...any size or shape.


Then, trace it onto a piece of wood.  I used plywood, but you can use any type of wood because it will be covered.  After cutting it out, quickly sand it to remove any rough edges.  Next, drill a hole at the top of the heart.


Cut the sheet moss into strips and start gluing to the heart.  I just covered the top and the sides and left the back bare.  Once it is entirely covered, staple chicken wire to the back of the heart and trim.


Thread a piece of ribbon or burlap through the hole and tie a bow.  Now its ready to hang.


Thank you for stopping by...have a great week!

Lesa

Friday, March 2, 2012

Rustic Heart


I wanted something rustic looking to lean on the shelf in my entryway and this is what I put together out of, your guessed it...pallet wood.

It was a quick and easy project...I cut these pieces from pallet wood and bought four (4) hinges:


I stained the wood with a dark walnut stain and spray painted the hinges with oil-rubbed bronze spray paint.   (make sure to spray paint the screws as well!)  I then gave the heart a coat of creamy white paint.  When it dried, I sanded some of the paint off to reveal the wood underneath using 100-grit sandpaper.  I then drilled a 1/2" hole at the top of the heart...large enough to thread a piece of jute through the hole.

After gluing the frame together, I attached the hinges at each corner.  At this point, I wasn't sure how I was going to suspend the heart...but I decided to attach a piece of chicken wire to the back of the frame.  Now I can attach the heart to the wire with a piece of jute. 


Very easy and very simple...and, if I get tired of the heart, I can easily remove the wire and insert a picture!


Thank you for stopping by.  I hope you have a great weekend!

Lesa

Sunday, February 26, 2012

Pallet Stars

After finishing the pallet storage for my kitchen countertop, I realized I still had another storage piece to use.  I didn't want it to go to waste, however, I couldn't think of where to utilize it.  However, thanks to Holly over at "Down to Earth Style", (which is a beautiful blog by the way) I remembered that she used hers as a flower box and hung it over a doorway...looks great!  I didn't hang mine over a doorway, but chose to hang it over my window seat in the kitchen.
Anyway, it still needed something on either side of it, so I decided to make a couple of stars.  I wanted them to have the same texture as the pallet box so I made the stars from the leftover wood.  Of course, the wood wasn't wide enough to cut out a star so this is what I decided to do...cut all the star points separately and then join them together with twine.


I stained the wood with a dark walnut stain and then thread the twine through the holes I drilled into the points.  I attached a small self-leveling hanger to the back and hung them on either side of the flower box. 


Thanks for stopping by...

Lesa