Tuesday, August 30, 2011

Before and After Nightstand

I had this nightstand stored in the shed.  At one time, it was white, had two drawers and had a home in my daughter's bedroom.  But, over the years it's been painted and pulled apart and now looks like this...


I thought with a little TLC I could fix it up and maybe my daughter can use it in her home.  First thing I did was put a piece of plywood in the bottom...


Next, I sanded the entire piece to remove any lumps and bumps.  Then I gave it a couple of coats of paint. (Sand Bar)


After the paint dried, I lightly sanded the nightstand using 220-grit sandpaper.  I sanded it a bit heavier along the edges to reveal the dark brown paint underneath.  I removed the sanding dust and applied Danish Oil in a medium walnut color to give the paint an aged look.


It needed something more, so I decided to make a canvas curtain for the front.  Again, just the canvas was a bit boring, so I made a burlap ruffle and added that to the bottom of the curtain.  I used a piece of dowel for the rod and two cup hooks for the brackets.


It still needed something to give it a bit of interest so I gave the top a tattoo.  I found the bird image after doing a "google" search and applied it using my freezer paper transfer method.


Now, I think it's done.  I hope my daughter likes it! 


Thank you for stopping by...have a great day!

Lesa

Monday, August 22, 2011

Freshening-Up a Laundry Room

My laundry room has been a bit of a mess for quite some time.  Several years ago, my husband built an addition onto the house and during that construction, he reconfigured my laundry room.  However, we never took the time to "finish" it.   My husband is usually very good about tackling any project around the house, but the laundry room has been put on the back burner.    I'm a very impatient person, so I thought I'd "freshen" it up a bit and make it a little more inviting.  Here are some of the befores to give you an idea of the "mess"...

See the freezer tucked in the corner?

Just a mess...and that window covering too heavy for the window!

There's that freezer...A wall of floor to ceiling cupboards would be nice on this wall.

Pictures speak for themselves.

Here are the "after" pics...

Stacked the washer and dryer to make room for the freezer.


Added that little shelf between the sink and the washer/dryer.  Painted the cupboards.


Made a valance and added "fake crystals" to jazz it up.


Added a shelf and a few accessories.  I painted the sign.


Built myself a little folding table and added a canvas skirt.  Hidden storage behind the curtain.

I don't know if I like this door or not.  I wanted to hide the stuff that I store on the shelf unit, but I needed a door that was lightweight.  So I built a wood frame out of 1 x 2 and then covered in the exposed area with fabric to match my valance.  I then added a crystal looking knob to match the crystals hanging from the valance.  Hmmm....


Well, there you have it...my freshened-up laundry room.  It's certainly not spectacular, but it works for now!
Have a great day and thank you for stopping by...
Lesa

Friday, August 19, 2011

Easy Breezy Wood Box

A few days ago I shared how to transfer an image from freezer paper to fabric.  As I had explained in that post, you can also transfer images to wood.  Therefore, I thought I'd share this project with you.


I started out with an old wooden box that looked like this...


I sanded it to removed the roughness and then added a coat of dark walnut Danish Oil...


I then mixed my "Sand Bar" paint with a bit of water, just to thin it slightly, and applied a coat to the box.  Once it was dry, I used my palm sander and 220-grit sandpaper to remove some of the paint to expose the wood grain.


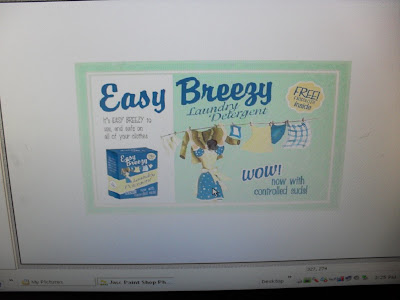
I found this image when I did a "google" search for vintage laundry labels and I loved the colors so I thought it would be perfect for the look I was going for...


Next...I printed this image (remember to select "mirror image" on the printer) and printed it onto the waxy side of my reusable sheet of freezer paper.  It looked like this...


I then wiped the wood box surface with a damp rag and then placed the image face down onto the box.  Using the back of a spoon, I burnished the entire area until I thought the image had transferred.


I wanted the image to look like a worn label so I was very happy with the results.  If I wanted the image to be "solid" I would not have sanded the painted surface so heavy.

I then decided to add jute handles to the sides of the box, so I measured and drilled holes in the sides, cut two pieces of jute to length and added knots.  Thread and secured the jute in the holes.  Handles!


I liked the box, as is, however I wanted to "soften" it a bit so my final addition was a canvas liner which I made from some leftover painter's canvas.  I added the trim from leftover fabric I had used in my laundry room.


I don't know what I'm going to use this box for...all I know is it's new home will be the laundry room. 


I hope you will give this a try and, if you do, I'd love to see what  you come up with!  Thank you for stopping by...have a great weekend!

Lesa

Monday, August 15, 2011

Transfer Images Using Freezer Paper

It was purely by accident that I figured out this method of transferring a printed image.  It is simple to do and you don't need any special paper or products!  If you can print it from your computer then you can transfer it to a fabric or wood surface.

Now, this project I am about to show you is not very exciting, but it will give you the idea of how the transfer is done...so here it goes.

I decided to cover my old and dirty mouse pad that looked like this:


I used canvas and cut a piece a bit larger that than the mouse pad. 


Then I cut a piece of "Heat n Bond" the same size as the canvas and, following the instructions, adhered it to the back of my fabric.  When it cooled, I removed the paper backing. 


I then centered the mouse pad onto the back of the canvas and, again, using my iron, adhered the canvas to the top of the mouse pad.  I then wrapped the excess canvas to the back of the pad and used my iron to attach the edges.


I cut a piece of macramae jute and secured it to the edge of the pad using hot glue.


So, now you know how I covered the mouse pad...onto how to do the transfer.

You will need freezer paper, 8 1/2" x 11" paper, spray adhesive, ink jet printer and your imagination.


Cut a piece of freezer paper a bit larger than your standard-sized paper.  Spray your paper with spray adhesive and lay on the "paper side" of your freezer paper leaving the waxy side exposed.


Trim the excess freezer paper using sissors.  You now have a "reusable" sheet of transfer paper for all your projects. 

I found the italian postage image from "The Graphics Fairy" and set my printer to "mirror image".  You will need to print the image on the "waxy" side of your paper.  (be careful not to smudge the image)


Now, wet the surface you are transferring too, however, your only want to "slightly" dampen the surface, not soak it!  I dampened the top of the mouse pad with a sponge.  Place your image on the surface and "burnish" using the back of a spoon until you have rubbed the entire image surface.   Carefully lift the paper off and there you have it...an image transfer!


I kinda rushed through this project because I was excited to share it with you so, as you can see, I didn't quite center my image onto mouse pad.  Also, my pictures are not very good...very dark and they don't show the true colors.  Sorry, but I hope you get the idea!  Oh...and before I forget I mentioned that the paper is "reusable"... once you transfer your image you can simply wipe the "waxy" side with a damp cloth to remove any remaining ink.  You now have a clean surface to print a new image for a new project.


As I mentioned, this method works well on wood as well, so I will be sharing a wood transfer project in the next day or two.  Until then, thank you for stopping for a visit! 

Lesa

Wednesday, August 3, 2011

It's Hard to say Goodbye

Today, we had to say "goodbye" to our beloved "Allie".  She was not your typical lab...she hated water and she was much smaller in size than normal labs.  But, she was such a good-natured girl.  Always happy and wagging her tail.  Allie brought alot of joy to our family and she will be sadly missed. 

Allie
June 10, 1996 - August 3, 2011


Best Friends!
 We will miss you, Allie!