Monday, February 28, 2011

Bird Silhouette Plaque

I was inspired by Kim of Too Much Time on My Hands when I came across here "Little Birdies" plaque.  I loved it so much that I thought I would create my own version and this is what I came up with...


I simply found a scrap piece of wood and basecoated it with a chocolate brown color.  When it dried, I rubbed it with candle wax and then applied a light buttermilk paint color.  Again, when it dried I then sanded it to removed some of the paint to let the basecoat show through.  I drew my bird silhouette and then scanned it into my computer, enlarged it to the desired size and then printed it.  Using transfer paper, I traced the pattern onto the wood and then used black to fill in the birds and the branches.  Again, I sanded it to remove a bit more paint and then applied dark walnut Danish Oil to give it an aged look.  That was it.  Very simple. 

I haven't decided where I'll hang it...just can't decide if I like it on a neutral wall or my cinnamon-colored wall. 


Thanks for stopping by...have a great day!

Lesa

Monday, February 21, 2011

Bargain Chairs are Slipcovered

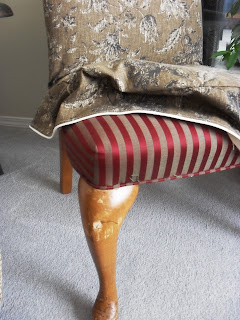
I finally found fabric to sew slipcovers for my bargain chairs.  However, I'm still undecided if I should add a ruffle to the bottom of the slipcover or just leave them with the cream cording on the edge. 


I guess I'll make my final decision once I finish the legs on the chairs.  They are in rough shape so I have to sand them.  Then I'll probably stain them a dark walnut colour. 


After the chairs are done,  I need to finish my table - again, I will sand the entire table and stain it a dark walnut to match the chair legs. (I think.)  Next, I have to finish the existing chairs - one step at a time, though.

Thanks for stopping by.  Have a great day!
Lesa

Tuesday, February 15, 2011

I've Been Given My First Award!

I would like to thank Suz at Inspiring Creativeness for honoring me with the "Versatile Blogger Award".  It's a bit intimidating being the "new kid on the blog", so to be recognized with an award is very exciting.  So, again, thankyou Suz!


Now, its my turn to pass this award on to 7 other blogs, but before doing so, the rules state that I must answer 10 questions.  Here is goes:

1.  Why did you create your blog?
I thought it would be fun to be able to share crafts and decorating projects with others who share the same interests. 

2.  What kind of blogs do you follow?
Decorating and crafting blogs.  Anything that inspires creativity and DIY projects.

3.  Favorite brand of make-up.
L'oreal

4.  Favorite brand of clothing.
I have no particular favorite.  Basically, anything that fits well, looks good and doesn't need to be drycleaned!  However, I must say that I have a couple of "dressy" outfits by Joseph Ribkoff - absolutely love!

5.  Indispensible make-up product.
Cover-up

6.  Favorite color.
I love neutrals, browns, beiges and creams.  (My daughter says I'm beige and boring!)

7.  Favorite perfume.
Again, I have no particular favorite, but Vera Wang and Chanel are a couple I like - just to give you an idea.

8.  Favorite movie.
Tough question to answer...I love comedy-romance movies.  Now, if you asked me what my favorite tv mini series is,  my answer is "|Thorn Birds".

9.  What country would you like to visit and why?
Honestly, I would like to explore more of my own country, Canada.  All the vacations we plan are out of country and it would be nice to see more of Canada.  I'm in the West, so it would be wonderful to travel to the East coast and Maritimes.
(For a more "exotic" answer, Italy and/or Germany as my Mom is of Italian decent and my Dad of German decent.)

10. Would you rather forget to put on mascara on one eye or forget blush on one side of your face?
I would rather forget blush, as my cheeks are usually pretty "rosy" without using any blush.

Okay, now its time to pass this award on to the following talented women and their inspiring blogs. 

1.  Cecily at Lavender and Pumpkins
2.  Dana at House Tweaking
3.  Stacy at The Project Shoppe
4.  Lori at Our Forever House
5.  Charlie at Attempting Aloha
6.  Meghan at Simply Stoked
7. Brittany at Pretty Handy Girl

Here are the rules:
1.  Thank and link back to the person who gave you the award.
2.  Answer the 10 questions above.
3.  Pass the award along to 7 blogs you recently discovered and enjoy.
4.  Leave your recipients a note telling them about the award.

Thank you for stopping by,
Lesa

Wednesday, January 19, 2011

Kitchen Backsplash Transformation


Look what a bit of paint and drywall compound can do!  I transformed my backsplash from stark white and burgundy tiles to a warmer tumbled stone look and I am quite happy with the results.   The original tiles measured 8" x 8" and were very ugly.  They looked like leftover tiles from a bathroom! 

This is how I created the look and, just a warning, when I undertook this project I had not idea that I would be sharing the process on a blog, so I didn't take many pictures of the process nor did I take any "befores".

Here's my "How-To":
1.  I washed the original tiles with T.S.P. all purpose cleaner to remove any dirt or grease and then I applied a good primer to the surface.

2.  I masked off each tile into four smaller tiles using 1/4" tape to create the grout lines.  I also created a border tile using the tape.  After the taping was complete, I started applying a thin layer of drywall compound using a spatula or putty knife.  I applied three coats, letting each coat dry completely before adding the next one.  After the final coat was dry, remove the tape and lightly sand the surface to remove any rough or raised edges.


3.  I wanted my border tile to have a design, so I drew a pattern and created a stencil.
**I'll share my stencil-making talent with you, but don't laugh.  I draw out my pattern/design onto regular white paper or kraft paper (whatever is handy) and then I cover the front and back of the paper with clear packing tape.  This kinda "laminates" the stencil and protects it from ripping, etc.  Once its all taped, I use an exacto knife to cut out the design. Voila!! A stencil!!**


4.  Now, apply your stencil to the tiles using a putty knife and drywall compound.  This can get quite messy!  Once, completely dry, again, lightly sand removing any sharp edges.

5.  Paint the entire surface with your basecoat color - mine was leftover wall paint in a light beige color.  Let dry.

6.  The I started adding a darker wash to the surface using more leftover latex paint thinned with water.  Just dip an old damp rag (t-shirts work well) into the paint mixture and start washing it onto the surface in a circular motion.  Keep working the paint into the grooves  until you are happy with the color. 

7.  I then added bits of highlights using a cream colored paint using a dampened seafoam sponge.  Again, just "play" with it until you are happy with the look.

8.  Finish by applying a coat of varathane in a gloss finish.  This gives the backspash durability.

This took me three days from start to finish.  I am very happy with the results and have actually fooled a few people who thought is was actual tile!  I did a fireplace makeover using a similar technique, which I will share with you in a later post.


If you have any questions, don't hesitate to contact me at maloneyl@telus.net.

Thank you for stopping by.
Lesa


3.

Monday, January 17, 2011

What a Bargain!

I have to share with you the great bargain I found at our local New & Used store.  I found four of these chairs for $14.95 each.  I just couldn't pass them up so I bought all four.  They need some cosmetic finishing...the wood needs to be refinished and I definitely need to recover them or make slipcovers for them, but other than that, they are very sturdy and very comfortable. 


Now, I need some suggestions and help from all of you.  My husband built our table a few years ago, as we needed a table to sit twelve people.  (I had my family come for Christmas.)  He also had plans to build 12 chairs, but ran out of time after finishing six chairs.  I think he has since lost interest in finishing the remaining chairs, so I have been on the hunt to "outfit" my table.


 Here are a few questions that you can help me with:

1.  Should I only use two of the new chairs - one at each end of the table and keep the existing chairs?  Or, should I use all four and find two other chairs for each end of the table and keep the existings chairs for extra?
2.  Should I recover them or sew slipcovers?  If slipcovers, a ruffle at the bottom?
3.  What color of fabric?  I love all the white slipcovers out there, but I don't think that would fit in my house.  So, any suggestions?  My kitchen is a tan colour with a cinnamon color accent, wood floors and white cupboards.
4.  Should I paint my table?  I had thought about painting the bottom of it a creamy white and then refinishing the tabletop with a dark walnut stain.

Your help and suggestions would be welcomed!!

Thank you for stopping by.
Lesa

Thursday, January 13, 2011

Another Wall Art Project...

Here's another wall art project I'd like to share with you...


You'll need:

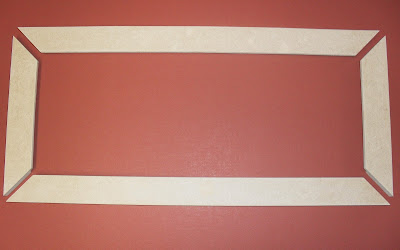
MDF board - 2 pieces 1 1/2" wide x 18" long
                    - 2 pieces 1 1/2" wide x 6 1/2" long
(There will create your frame.)
Burlap
Glass
DecoArt paint - Lamp Black and Light Cinnamon
Rust-oleum Frosted Glass
Masking Tape
Sandpaper
Elmer's Spray Adhesive
Wood glue
Mat board in a light cinnamon color.   (Just a note...the color you choose with show through the weave of the burlap.)

How To:
1.  Cut the MDF to the proper width and length.  Create a 1/4" rabet using a router or a tablesaw.


2.  Use glue and claps to secure the wood at all four corners, creating your frame.

3.  Paint the frame using Light Cinnamon.


4.  When dry, apply candle wax to the edges and top of the painted frame.  Now apply Lamp Black to the frame and let dry.

5.  Sand the frame revealing the bottom color to give the fram a more weathered look.


6.  Cut your glass to fit inside the frame.  Apply masking tape to the top of the glass 1/2" in from all edges to create a rectangle.


7.  Spray with frosted glass and let dry.  Remove the tape.


8.  Center and tape the lettering on the back of the glass.  Use Lamp black to apply lettering to the glass.  (Just a note...the frosted glass makes painting on glass very easy, giving the paint something to adhere to.)


9.  Cut the mat board and burlap to the same size as the glass.

10. Use the spray adhesive to secure your burlap to the mat board.  As I mentioned, the background will show through the weave of the burlap.

11. Place the glass on top of the burlap and place in frame.  Secure in place.  I covered the back with brown kraft paper to give it a more finished look.  It also keeps dust from getting in behind the glass.  Attach a self-leveling hanger.


I have a few more ideas using this technique so I hope you will continue to check back for other projects.  Would love to hear your feedback!  Thanks for taking the time to stop by!
Lesa

Saturday, January 8, 2011

Dremel Trio


I received a new power tool for Christmas, the Dremel Trio and I absolutely love it.  This tool cuts, sands and routs.  It really is amazing.  What I love is that you can start your cut whenever you want because the bit allows you to make quick and easy plunge cuts anywhere in your work and its very easy to control.


When I made this tray for my ottoman, I had to pre-drill holes in each section before I could use the jigsaw.  Plus, the jigsaw is much harder to control in the corners.  I found myself stopping and continually repositioning the wood piece.  Very time consuming.

However, the Dremel Trio not only allows you to plunge cut, but it also cuts in any direction while keeping the tool in the same orientation.  It makes cleaner cuts and smoother edges requiring less sanding.

This tool is a "new addition" to our workshop, so I'm still learning all about it's multiple uses.  If you like woodworking this is a "must have".

Below,  is my first project attempt with the Dremel Trio.  I love old architectural pieces, so I thought I'd try making a door crown (to look like an old architectural piece).


First I drew a pattern on paper and cut it out.  Then I traced it onto my wood.  I used plywood as this was all I had at the time.  Then I cut it out...yes, with my Dremel Trio.   I then sanded the edges with...you guessed it, the Dremel Trio.  I used a palm samder to sand the top and bottom.


I applied a coat of dark brown paint.  Once dry, I applied a lighter shade of brown paint followed by a final coat of cream-colored paint, letting it dry in between coats.  (I forgot to mention that in between each coat of paint I rubbed candle wax over parts of the wood surface and edges allowing for easier paint removal during the final stage.)

Once it was completely dry, I started sanding the piece to reveal the layers of paint underneath.  I finished by applying dark walnut Danish Oil with a rag and then wiping off to give it more of an old, antiqued appearance.  Attach a self-leveling hanger of the back and I was done.  I hope you like this project.


Thank you for taking the time to stop by.

I am linking to:  Funky Junk Interiors
                        Finding Fabulous "Frugalicious Friday"


Lesa